- Your assets
- Notebook and pencil to record technical information
- Camera, scanner, or both
- Hard drive
- Computer
1
Introduction
It depends on what you have! Each technique creates a different effect and can ultimately change the way the work looks digitally. This step doesn’t have to be purely about documenting your work, think about how you can use these processes to enrich and add to your work.
Equipment
Guiding Questions
Think about these questions as you work your way through the lesson:
Anjuli's Process
Your digitisation process is going to depend on:
There are a number of ways you can digitise a handmade asset.
The most common are:
Remember to have a little fun with playing up certain characteristics of each process - like layering works with a scanner or experimenting with shadows when photographing.
Anjuli's workflow
Instructions
What do you have access to and how does it work? Access some tutorials to get yourself started. Type the make and model into Google and see what pops up.
Note: there are some examples below that will go over scanning and photographing your assets.
Read the blog posts and start to develop an understanding of what file is used when. Figure out the file types you are able to create with the equipment you have. Watch a few clips about resolution, pixels and file types. Having a base understanding of how things work always results in a better outcome.
Digitise one asset and record the process so that if it’s successful you can repeat it. Chances are you will need to change settings/set up etc. to get it right. Remember to make notes so that you can repeat the process!
Suggestion: write a list of everything you are going to digitise and the technical info needed. This kind of note keeping is really helpful in future projects. Make sure you are saving all the files to a common SD card or cloud based folder (keep all your files together).
Naming files and folders is really important, think of your device as a library, naming files and folders makes it easy to find exactly what you are looking for, rather than tirelessly sorting through folders. Taking time to think about the ‘information architecture’ of your digital assets is crucial.
Scanning your assets
Scanning physical work onto a computer using a flatbed scanner is a great way to easily ‘transfer’ your work into a digital format. It usually involves placing something flat (drawing, print, photo) onto a bed of a scanner. This process flattens the work, which is usually good for 2D illustrations and other materials. Scanning can also be an interesting tool to try things such as collage.
It is important to keep in mind, scanning can sometimes create a lot of visual ‘noise’ which makes parts of the scanned image slightly fuzzy. However, this can be fixed and removed when the work is digitised through programs such as Photoshop or Pixelmator.
You can scan physical objects as well, however, that’s more for artsy experimental files … watch the clip on how the scanner works to see why.
Scanners are the best way to capture the above types of assets because despite advances in digital camera (and cell phones) technology, if new, they produce files that are consistent and high resolution.
Each scanner has different settings but there are a few SOPs (standard operating procedures) that you should aim to follow:
Ensure your work is as clean and ‘perfect’ as possible - you don’t want to scan data such as smudges and unnecessary lines that could have been rubbed off beforehand!
Check your line weight - is it so light the scanner won’t even see it?
Clean the scanner bed before and after use
Check the file format the scanner is set to capture - you want the format that won’t compromise your work later
Check the resolution - it should be as high as possible and no lower than 300ppi
Check the density setting - if your lines are light you may want to adjust the density
Check ‘document type’ setting - you may want to adjust to ‘photo’ as opposed to ‘text’
Check the scanned image before moving on! It needs to be the best scan possible BEFORE you hit the editing phase. Sometimes you have to ignore the ‘rules’ and experiment to make sure the scan is the best possible for your project.
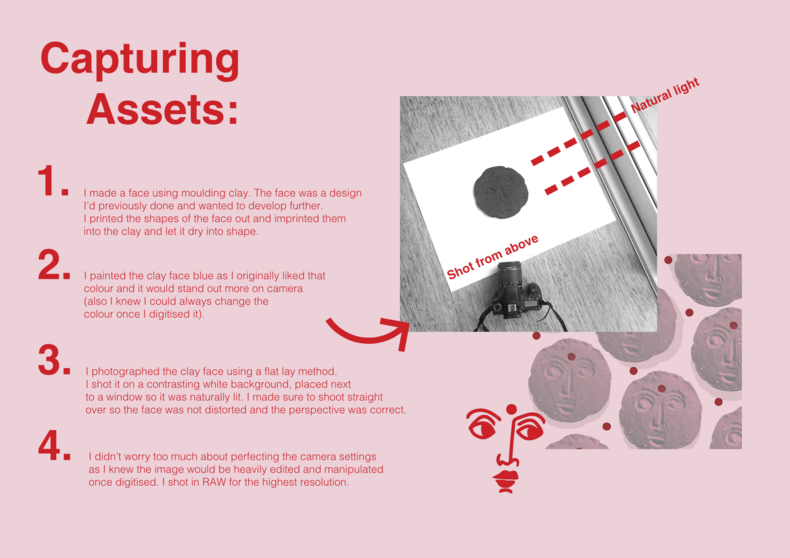
Photographing your assets
Again this comes down to access.
We recommend using a modern Digital SLR to do any photography. This is because the overall resolution will be higher as is your control with file types. However, smartphones are getting smarter! Again, as long as you end up with a high-quality image, in the correct file type ready to be edited then all is well.
Things to consider while photographing:
Remember: experimentation is a big part of this process because there isn’t one ‘way’ or SOP for everyone. It really does depend on what you have access to.
A wee video to appeal to the geek in us all ...