Wallpaper Project: Part A

5 lessons

Unpacking existing outcomes

Learning to design is about training yourself to observe the world in more detail and ask questions about what you see. It’s all about observation and identification followed by a series of critical questions such as; what has been used, why was it used, and what are the effects of those decisions?

Lesson menu

Equipment

  • Device
  • Internet
  • Printer (if possible)
  • Pens (different colours)
  • Copy of the quick reference sheets
  • Copy of the analysis task sheets

Guiding questions

Think about these questions as you work your way through the lesson:

  • Which elements and principles (DE + P) stand out in each work?
  • How has each designer used each element for visual effect?
  • Are there any similarities in the use and treatment of the DE + P?
  • Differences?
  • How has the time and culture of each designer influenced their use and treatment of the DE + P?

Lesson content

  1. Last lesson you were introduced to the design elements and principles (DE + P) and you created your own reference sheets. Today we are going to ‘unpack’ two examples of wallpaper design using the DE + P to describe what we see.

    Pay special attention to which elements have been used and how they relate to each other through the principles of design to create a successful composition.

    Success in this context seems simple: would someone think the print is cool/interesting enough to purchase and put on their wall? 

    Block one

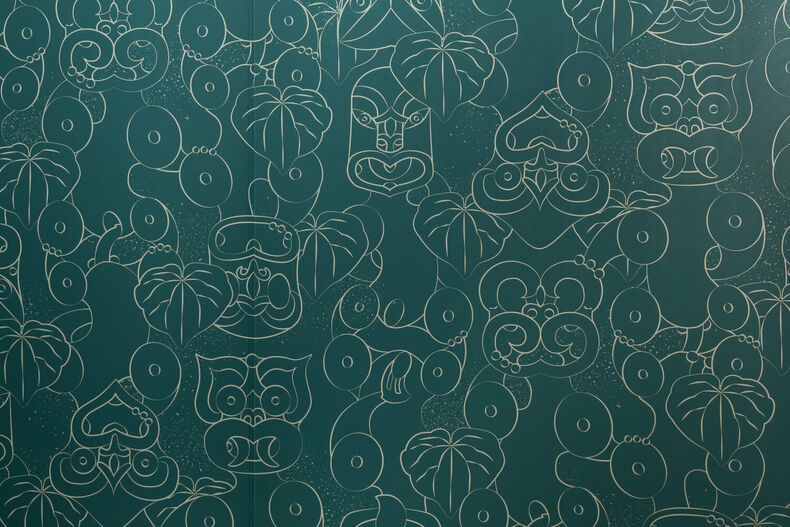
    Witehira's Whakapapa Wallpaper. Photo: Design Assembly

  2. Style, taste, culture, and trends all come into play here. However, the subjective aspects are only part of what you need to consider. The designers have still had to execute their ideas visually (whether or not you like those ideas are another matter entirely). That is an aspect that can be analysed more objectively using the DE + P.

    Remember to use the guiding questions and prompts to analyse the given examples. You should be able to use the Paper Leaf and your own reference sheets to identify and label the elements and principles easily enough.

    It's important to extend yourself to ask why the designer has made those decisions and how you think it affects the work.

    Block two

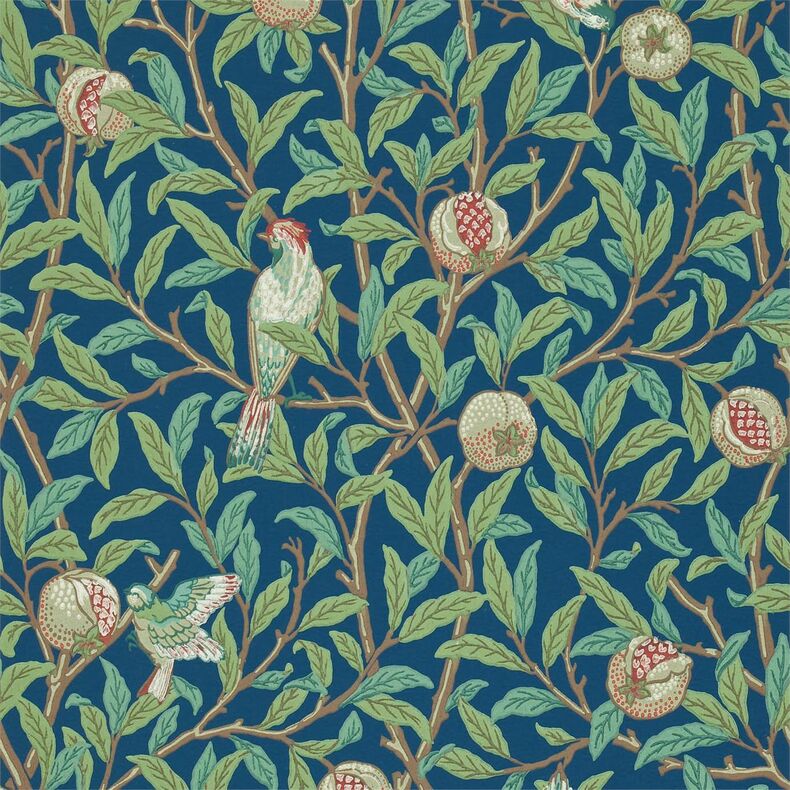
    William Morris's Bird and Pomegranate - 1926

Let's do something!

  1. 1

    Identify + Describe

    • Open the task sheet (if you can't print you could take notes on the document by using a PDF converter).
    • Identify all the obvious DE + P within each outcome.
    • Draw arrows and circle WHERE the aspects below can be found and add a label.
    • Write notes under your labels describing what you see (if it’s green, what kind of green? Dark? Light? Graduated? Transparent? Opaque?).
    • Compare and contrast the two examples.
    • Try to keep your responses clear, critical, and justified.
    Identify + Describe

    Find, label, and add notes

  2. 2

    Explain + Extend

    • Use the prompts and guiding questions to add more detail to your notes.
    • Remember to comment on WHAT you’re looking at as well as WHY you think the designer decided to present that information in that specific way.
    • Explain how the treatment of specific DE + P has contributed to the success of the work (for better or worse).
    • Explain the overall intent you think the designer was going for.
    • Explain the overall successfulness of the outcome.
    • Extend your answers by justifying our explanations - reference research to do this.
    • Use the links to learn a little more about the designers so you can justify your explanations.
    • Connect with your own ideas/tastes - is there anything you would like to try, inspired by these works Anything to avoid?
    Explain + Extend

    Analysis task sheet

  3. 3

    Prompts

    • Elements and principles of design (line, shape, size, texture, colour, space, contrast value +, alignment, repetition, proximity, hierarchy).
    • What can you see/do you recognise?
    • What is the intention/purpose of this work?
    • What is the story behind it/context/why?
    • How was it created (process/technique)?
    • Who is this for and how was it received?

Tips & tricks

  • The more you understand the design elements and principles and how they are used, the stronger of a maker you will become
  • It is worth doing extra reading and research in this area

Next lesson

5

Creative Story