Self-Portrait Project

9 lessons

Post Production

In this lesson you will edit photos and manage files from your photoshoot(s).

Lesson menu

Aims

    • To understand basic photo editing
    • To use editing tools with purpose to enrich photographic work
    • Familiarise yourself with chosen editing software
    Aims

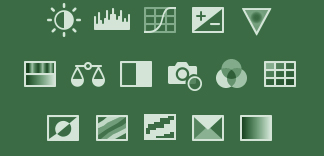
    There are many camera/editing icons to familiarise

Equipment

  • Bridge 
  • Photoshop
  • Lightroom
  • Camera RAW
  • GIMP

Guiding questions

Think about these questions as you work your way through the lesson:

  • What is the overall aesthetic you are aiming for through editing my photos? 
  • How can editing enhance the way your photographs are ‘read’?
  • Are there any specialised editing skills you need to research and learn?

Lesson Content

  1. You have just completed the shooting process, now it’s time to review the photographs! In some shoots you can take hundreds of photos. Working out an effective way to select and edit photos is key to the editing process. The first step in the editing process is ‘sorting’, this is a simple process of selecting which photos you think are worth editing/expanding further. There is no need to edit every single photo you take in a shoot (unless this is part of your concept). I like to think of the next steps consisting of two parts; ‘prepping’ and ‘styling’. The ‘prepping’ element is referring to fixing technical things such as exposure, white balance or levels, getting the photo prepared for the next step. ‘Styling’ refers to the process of editing which aligns with your idea/aesthetic, this includes more purposeful editing such as graphic manipulation or stitching multiple photos together. How you choose to edit your photos is up to you. Personal preference and aesthetics play a big role in the way a lot of photographers edit their photos.   

    Basic photo editing:

    • This editing step refers to fixing or prepping the photo. Some photos will only need slight adjustments and others will need none at all
    • Through programs such as camera raw or photoshop, we can make basic adjustments to the photo. At this stage, you can crop, adjust exposure, highlights, black point, shadows, contrast, and even saturation
    • Play around with each adjustment to figure out what you think looks best. You can even save particular editing presets, which you can apply to multiple photos so they all look the same

    These are some of the main photo editing tools on photoshop: 

    Brightness/Contrast

    • Adjusts the OVERALL level of brightness (or lightness) of the image. Contrast can be adjusted, referring to the difference between light and dark in the image


    Levels

    • A slightly more complex way of adjusting brightness and contrast at the same time, as well as the tonal range. This is done through an image histogram where you can adjust more intentionally


    Curves

    • This tool allows you to pick different parts of an image to adjust the tonal range. This can be done by changing an image in separate RGB (red, green, blue) colour blocks, allowing you to adjust each tonal range


    Exposure

    • It can be a helpful tool to adjust camera exposure mistakes made during the shoot. It mostly lightens the highlights in the image


    Vibrance

    • This adjusts the overall colour intensity in your image, usually without over saturating the image 


    Hue/saturation:

    • With the hue adjustment, you can change the overall colour of your image (e.g. adding a pink hue to the whole image). Saturation can be used when wanting to either add or take away grey from an image


    Colour balance

    • This allows you to work with the shadows, midtones or highlights of your image and even out or manipulate the overall colour of your image (e.g. if your unedited image has an overall green hue to it, you can fix this through colour balance)


    White balance

    • This is an important tool if you are wanting to colour grade your image correctly

Instructions

  1. 1

    Download images from SD card onto a folder on your computer or laptop

  2. 2

    Open the folder in a programme such as Bridge or Lightroom

  3. 3

    Have a look through your photos to get an idea of how the shoot turned out

  4. 4

    Start to systematically sort through photos and select your favourites by starring or changing names (for this sorting stage I use Adobe Bridge, which allows you to ‘star’ images. I go through the images from the shoot, giving a 1 star to the images I like and want to edit)

  5. 5

    Once you have gone through the whole folder and chosen your best images, open the first image in camera raw or photoshop

  6. 6

    Now you can do the basic technical editing and fix any potential mistakes (exposure, highlights etc.)

    Note: examples to these instructions are found in the videos below.

Lightroom Workflow with Kai W

Post Photoshop Workflow with Julia Trotti

Photoshop and Lightroom Workflow with Julia Trotti

To Edit or not to Edit with Sean Tucker

Tips & tricks

  • Creating your own workflow is really important for the editing process. Finding the way you work the best will help you to be efficient and get things done
  • Naming files and folders is really important, think of your device as a library, naming files and folders makes it easy to find exactly what you are looking for, rather than tirelessly sorting through folders
  • When saving your edited photos, make sure you save them as photoshop files (not just jpegs). This means you can go back and edit them further. It also keeps the biggest version of the file available for output/printing
  • When exporting your photos as jpegs, make sure you export as high resolution to maintain the quality (300 dpi)

Next lesson

9

Finishing Up