Why this project?
I chose to do the self-portrait project as an activity during lockdown. The words ‘self’ and ‘portrait’ were intimidating. They suggested I would be displaying just my face; an up close view.
Growing up I had been insecure with how I looked. I was made to be ashamed of my bushy thick island hair, big eyes, nose and lips, simply because they were features not shared by many of my classmates nor the faces in the magazines.
Yes, one grows and becomes more confident in their skin, in time, but admittedly the topic can still be confronting. Having had a lot of time to reflect about priorities and values during lockdown I felt taking on the self-portrait project would be a milestone for me to no longer let those childhood hurts be wounds anymore.
It was time to put a stake in the ground and say ‘I am who I am. This is me’ and love it. Lessssss go!
It was interesting to learn about different artists and how their work was a form of output of who they were. I admit, I was only familiar with these artists because I had heard them referenced in a film. Reading about their background and the themes/ styles signatured to the artist, helped me to realise that anything we produce has a part of you in it. We create to express. Whether we express who we have always known ourselves to be or who we feel we are at the moment, is for the artist to know and the viewer to explore.
It is as if art or self-portraits in a way are an invitation to see the author, the artist. Hence, why I felt this was going to be a brave exercise on my part.
Although I have no intention of making my project the theme to my social media posts for the season, I hoped it would be used as an example for the novice photographer. Using my iphone was the only form of familiarity I had going into this project. I was ready to learn.
Hunt + Gather
I literally Google image searched ‘self-portrait culture’ and ‘self-portrait religion’ to see how those elements might be portrayed in a self-portrait.
This exercise was interesting as my initial understanding of a self-portrait was a photo of just yourself - if you reflect back to the individual shots taken in primary school so parents could have a wallet sized photo of you. The only form of identity included in these primary school photos was the school uniform.
During the hunt and gather exercise, religion and cultural identity were portrayed as a prop in a person’s self-portrait, an artefact included in the photo. Sketched self-portraits show an attempt at displaying one as multi-faceted with half the face of the person and the other half of the various things that form their identity.
I wondered, what does a self-portrait with just the face alone, no props, portray? I guess I wanted to see if it was possible to show the different elements I identify with in just my face alone?
Upon viewing self-portraits without any props I found a person’s eyes as the most captivating feature; it would draw me in. Viewing photos where artists focused on the eyes of the model, the image (reflection) within the pupils was somewhat mysterious. The initial glance of the photo allowed you to see the model, continue staring and you begin to think there was more to the photo than you actually saw.
Collecting Personal Imagery
I had taken the title of this project quite literally in that I was going to take a self-portrait. I realised upon viewing Anjuli’s approach that I didn’t need to be the model in the shot, but that another model or artefact could have been the representations.
So, with the idea of me being the model in my self-portrait I explored representative selfies or pictures of me on my phone. I had not thought of pictures as representations before; they just captured moments. However, investigating how photography might explore the discussion of self-portraiture, I began to see pictures differently. They were more than the moment it had captured. They communicated that the place, the pose, the people captured too, had meaningful representation. It is why we care to capture it.
Clarifying My Intent
I used the brainstorm provided by Anjuli as a guide to think about what elements of me I most wanted to portray. I looked at my cultural, religious, collective, gender and national identity and artefacts that may best represent these elements. These objects had to be sentimental and not just representative.
Appreciating that the person I am is multi-faceted I wanted my photos to answer the question; How do I show I am more than what you see? How can self-portraiture show that I am more than what you see?
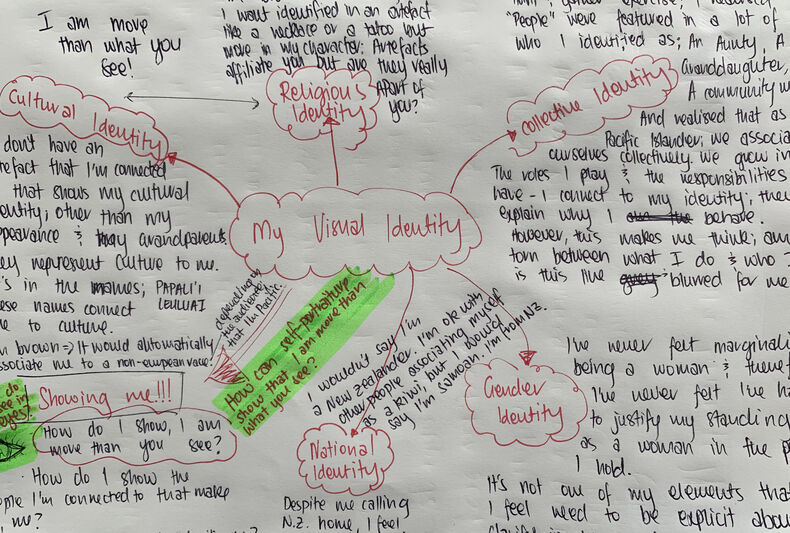
No one element had more love than the other. I want to acknowledge my growth and evolution and how different parts of me have blossomed at different seasons. Doing a self-portrait is fitting in this season of my life, as I draw upon these different elements to make courageous steps forward.
Now, I am not a photographer by any means. The only device I had on hand was an I-Phone.
I read through the tips for iphone photography as my research for how I might go about taking my images. In lesson 5, I settled on a theme for my self-portrait ‘I am more than what you see’.
I saw Anjuli’s example and liked the idea of the window. It made me think of two things. Firstly, that the eye is seen as the window to the soul. Secondly, different things can be seen in different frames/ quadrants of the window.

I explored the frame quadrant idea and thought maybe I could have myself in two quadrants of the frame, with various artefacts of me in the other quadrants. However, it seemed too busy.
I gravitated to the idea of ‘simplicity’ outlined in the tips particularly because I only had an I-Phone and no photography training. I feared I would lose myself in the process.
I Google image searched ‘more than what you see’ (not very abstract) to get some ideas on how I might shoot my theme; the iceberg concept came up and resonated with me straight away. This supported the idea of the window frame quadrants but again - too busy and I was going to be taking the photo myself (wasn’t too sure how I might do that with me on the other side of the window).
My idea of trying to display an image through reflection of the eye seemed a bit too difficult. I tried to do a shot like the ones I had researched but trying to make the reflection in the pupil the focus was challenging.
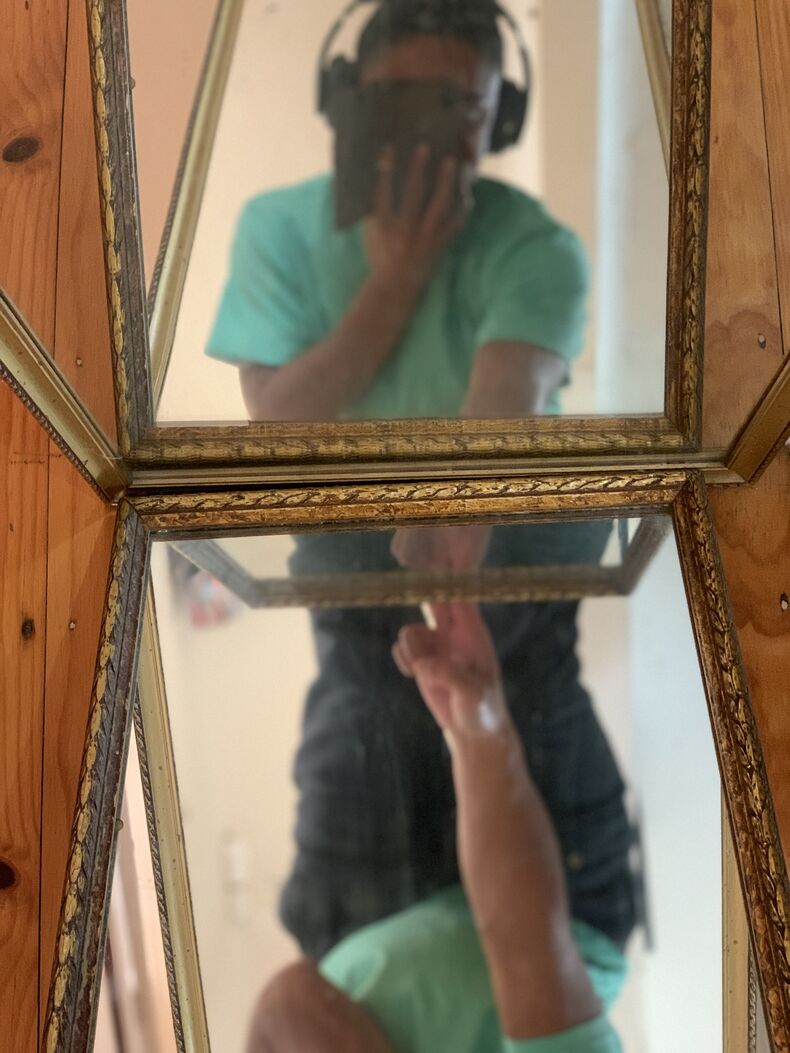
I then thought about mirrors. I was trying to see how I might reflect an image through my eyes; reflection within a reflection to show my theme. I liked when I put two mirrors together and saw a different part of me in each mirror. I was sold on the use of mirrors.
Refining the Mirror
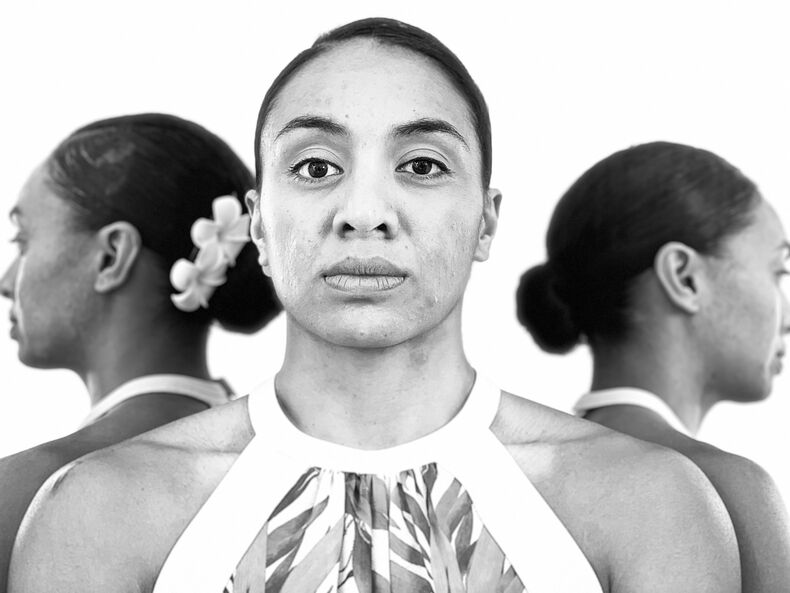
To avoid holding mirrors I placed them in the corner to get different angles of myself. The corner allowed there to be three figures in the shot; two reflections looking out and one face on image.
I liked the simplicity of this idea but hesitated because I was literally the focus.
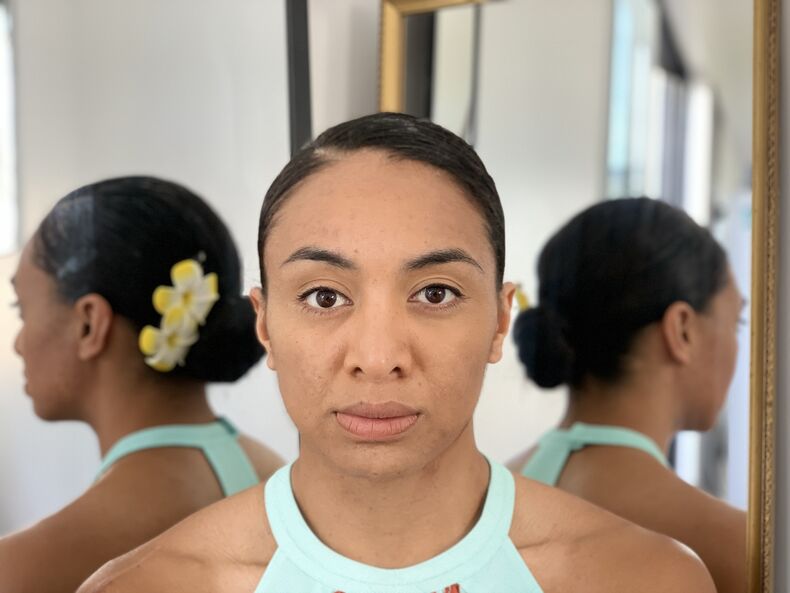
Happy with three figures I wanted to differentiate the two reflections a bit so that all three figures had a subtle difference. This would help reinforce the theme; I am more than what you see. At first I did not want to include props in my shot. However, at this point of the process I saw a need for the props. I thought I could wear something that was different in the front and back and added the flower to show my culture.
Later, I found it interesting that I gravitated to the flower - culture element of me to help enforce my identity and be a point of difference.
Post Production Editing
At the beginning of this lesson I thought I had done this stage simultaneously when I was taking the shots as I was playing with different filters and lighting on my IPhone. I was happy with the initial shots and thought I didn’t need to edit them.
However, purely for the sake of learning I watched the links and appreciated how editing could really enhance the shot. Yes, you hear people say ‘oh, that shot was Photoshopped’ but if you had never photoshopped before nor seen it done - one has no bearing as to how good a shot can become when edited.
I became overwhelmed with the idea of having to edit via Photoshop - I was able to get a free 30day trial but not knowing what each tool did, made me want to keep this part of the exercise simple. Thankful for Google I typed in ‘photo editing IPhone’ and sure enough there was a tutorial on ‘How to edit photos on iPhone using the built-in photo apps’. This was perfect for me. The project was the first time I had actually entered the world of ‘photography’ on purpose. I appreciated that I already had much of the tools on my iphone and could be creative in that sense of what appealed to my eye.
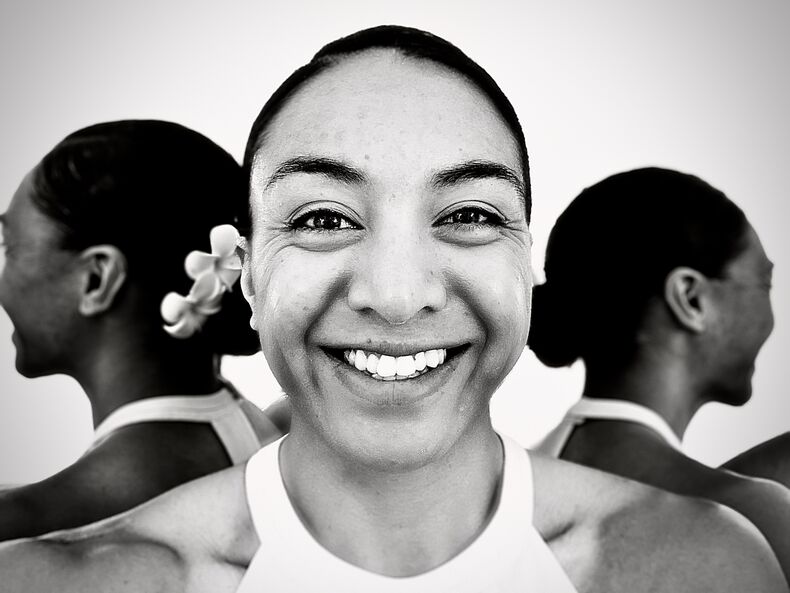
The editing exercise literally allows you to be a ‘tutū’ (verb: to be stirred up, mischievous, rebellious, disrupt), used in the lighter sense of the word to ‘fiddle around with something’ and learn as you play. The exercise was therapeutic. I originally thought my photos were fine. Then when I began playing with exposure, highlighting, shadows, black points, saturation, definition, temperature etc. I began to see things I didn’t see before. In the coloured photos; the colours became vibrant and succulent. In the black and white photos I played with toning down the lighting to bring more of my face to life. Comparing the photos before and after was ‘buzzy’ because the edited version made me look at the same image but feel something different. I feel that’s a powerful experience to be able to create.
Finishing up
A lot of time had lapsed since I had done the photo shoot and my photos had remained unedited. Procrastination favoured by my complacent view of editing and the initial reluctance to dive into something new.
Having to consider the final output of my work was interesting because at the beginning of the project I had not considered this. I was more caught up in the idea of actually putting myself in front of the camera but did not think about what I would actually do with the portrait.
Since the whole endeavour for me was about being brave and accepting who I was, what I looked like and wanting to communicate that I am more than what you see - the final product for me would be to print it, frame it and put it in my room.
I would never usually do this. I initially cringed at the idea. But I knew it would be another brave step to be proud of who I am and what I represent. If that means putting myself on display in a frame, then be brave I shall. This is me.
Note: It was so hard picking one image. Angles, proximity and colour all delivered different messages or themes. My top three images are the ones diasplayed as full sized images (above and below).
I leave you with the image I think best depicts me at this stage of my life.